Linux Series EP1: Understanding and Mastering File Permissions
Introduction
Welcome to this comprehensive guide on Linux File Permissions. If you're a Linux user or system administrator, you're likely aware that file permissions are a crucial aspect of your system's security. They dictate who can read, write, and execute files - essentially governing access and control over your files and directories. Understanding how they work can help you maintain a secure and efficient system.
In this post, we will delve into various facets of Linux file permissions. We'll touch upon key concepts like chmod, chown, and chgrp commands, reading file permissions, symbolic and octal file permissions, and the process of changing permissions to execute scripts.
Whether you are a beginner trying to grasp the basics, or an experienced user looking to refresh your knowledge, this guide is for you.
Understanding File Permissions
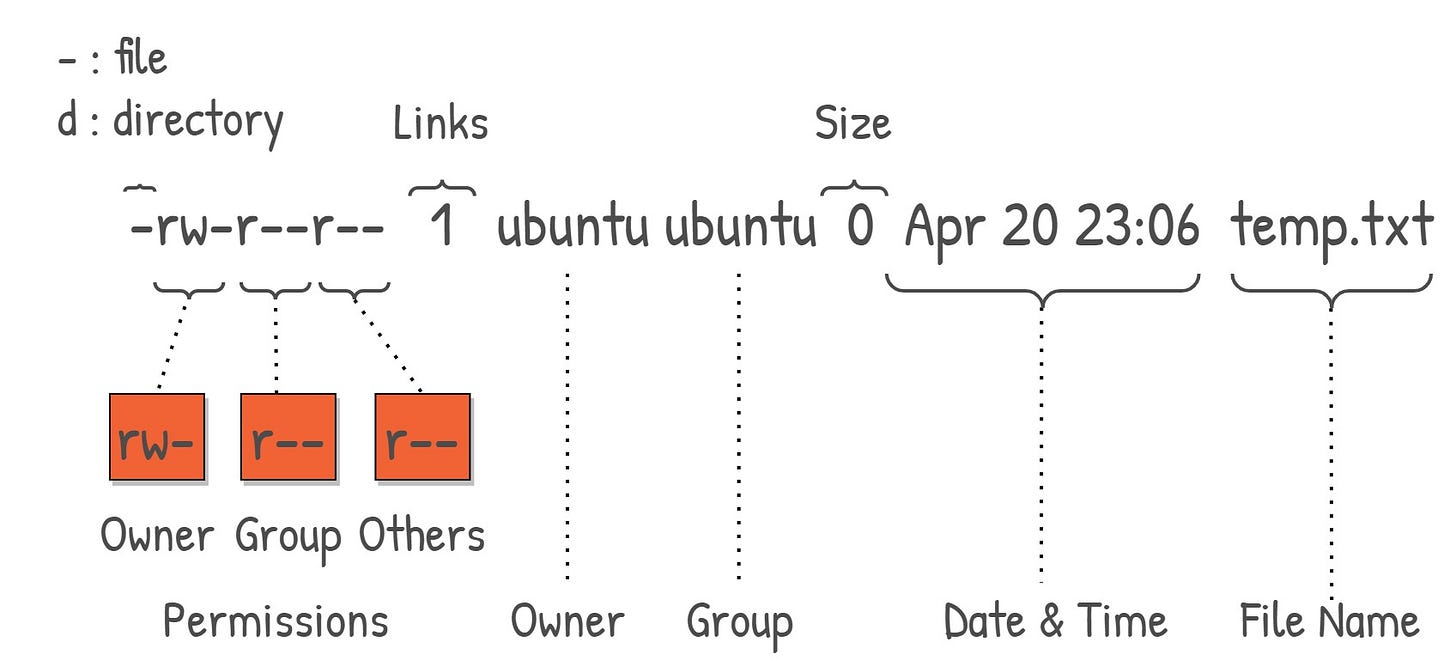
Before we dive into the commands to manipulate file permissions, let's first understand how to read them. When you execute the command `ls -l` in your Linux terminal, it returns a list of files and directories with their respective permissions, among other details. Let's take a closer look.
$ ls -l

drwxr-xr-x. 4 root root    68 Jun 13 20:25 work
-rw-r--r--. 1 root root  4017 Feb 24  2022 vimrc
Here, the first column represents the file permissions, which we will focus on in this section. The rest of the columns provide additional information such as the number of links, owner, group, size, timestamp, and filename.
File Type
The first character of the permission string signifies the file type. A '-' indicates a regular file, while a 'd' stands for a directory. For example, 'work' is a directory (d), while 'vimrc' is a regular file (-).
Permission Settings
The next nine characters in the string represent the permissions for three distinct entities: the `user` who owns the file (user permissions), the `group` that owns the file (group permissions), and `others` (other permissions).
Permissions are further broken down into three types: read (r), write (w), and execute (x). Each entity's permissions are represented by a set of these three permissions. For example, in the permission string `rw-r--r--` for the 'vimrc' file, the user has read and write permissions (rw-), the group has only read permissions (r--), and others also have only read permissions (r--).
Extended Attributes
Sometimes, you might notice a dot (.) or a plus (+) at the end of the permission string. This signifies the presence of extended attributes. Extended attributes are used to set additional permissions or access controls.
The file owner is 'root' and the group owner is also 'root', as indicated by the third and fourth fields in the output above.
The Basics of Binary and Octal Numbers
In order to comprehend octal file permissions, you must first understand binary and octal number systems.
‘Binary’ is a base-2 number system, composed of just two numerals: 0 and 1. Each digit in a binary number represents a power of 2. For example, the binary number '101' equals 5 in the decimal system (1*2^2 + 0*2^1 + 1*2^0 = 4 + 0 + 1 = 5).
On the other hand, octal is a base-8 number system, utilizing digits from 0 to 7. Each digit in an octal number represents a power of 8.
A key point to note is the relationship between binary and octal. Three binary digits form one octal digit. For example, the binary number 101 (5 in decimal) becomes 5 in octal as well.
Octal File Permissions
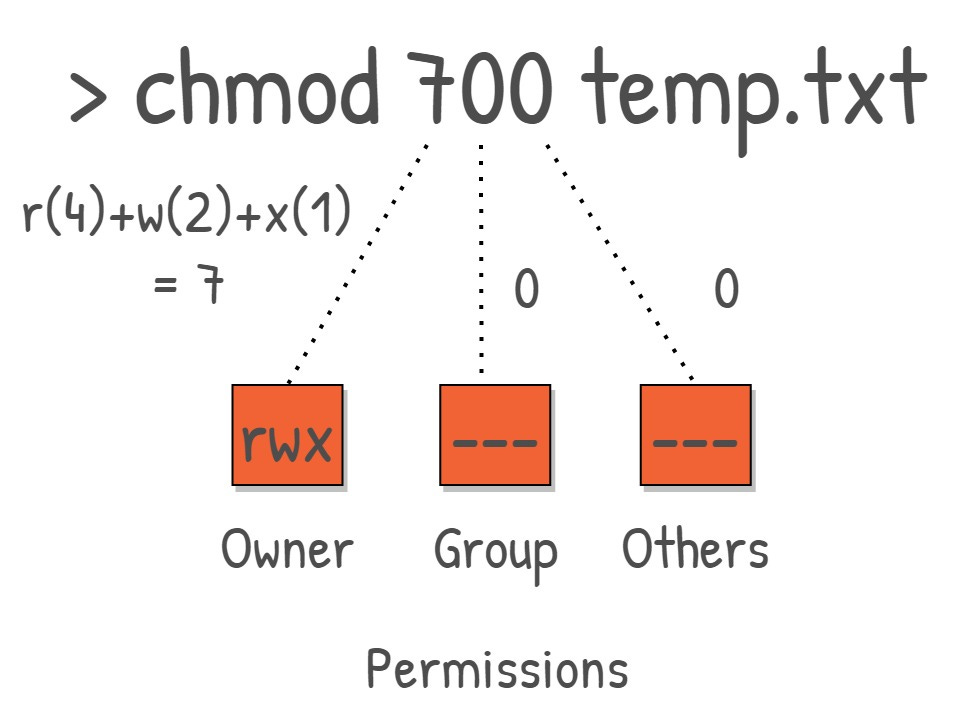
In Linux, permissions can be represented in an octal format which translates the combination of read (r), write (w), and execute (x) permissions into a single octal digit. This is done by assigning a numeric value to each type of permission:
Read (r) = 4
Write (w) = 2
Execute (x) = 1
No Permission (-) = 0
The sum of these values for a specific entity (user, group, others) forms an octal digit. This makes it easier to set or change permissions.
For instance, a permission set of rw-r--r-- would translate to '644' in octal permissions. Here, '6' (4+2) corresponds to the user's permissions (read and write), while '4' corresponds to the group and others' permissions (read).
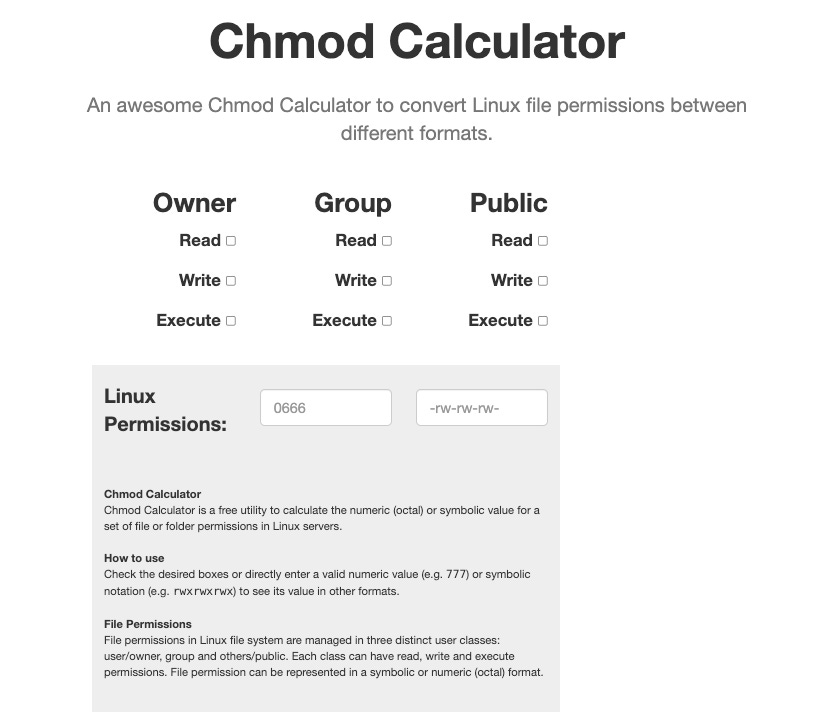
You can check which octal number to use for a specific set of permissions using the chmod calculator
Symbolic File Permissions
While octal permissions are concise and handy, Linux also offers a more descriptive way to handle permissions: symbolic file permissions. In symbolic notation, the permissions are represented as they are: r for read, w for write, and x for execute.
The syntax for symbolic permissions is ugoa (user, group, others, all) followed by an operator (+ for add, - for remove, = for set exactly) and then the permissions you want to set (r, w, x).
For example, to add execute permissions for the user on a file, you would use the command chmod u+x filename.
Changing File Permissions with chmod
'Chmod' stands for 'change mode'. It is used to alter the access permissions of file system objects. It supports both octal and symbolic modes
.
For instance, to change the permission of a file named 'sample.txt' to 'read and write' for the user, 'read' for the group, and 'no permissions' for others, you would use the command:
$ chmod 640 sample.txtIn symbolic notation, the same command would look like:
$ chmod u=rw,g=r,o= sample.txt✅ Join our Linux and Shell Scripting Course on Amigoscode
Are you enjoying our Linux series so far and wish to dive deeper? Check out our comprehensive Linux and Scripting Course available at Amigoscode. This course aims to equip you with the knowledge and skills to navigate the Linux environment confidently and utilize its robust scripting capabilities.
Whether you're a beginner starting your Linux journey or a seasoned user looking to brush up on your skills, this course has something for everyone. The Linux and Scripting Course are taught by experienced instructors who will guide you on your Linux and Scripting journey. They have designed the course with real-world scenarios in mind, helping you to grasp concepts quickly and apply them effectively.
The course covers everything from basic Linux commands to advanced scripting techniques. By the end of it, you will have a deep understanding of Linux and be proficient in scripting, a valuable skill in today's tech landscape.
Enrol Now!
To enrol in the Linux and Scripting Course, simply follow this link. Investing in this course means investing in your future. Elevate your Linux and scripting skills to the next level with Amigoscode today!
Changing File Ownership with Chown
Sometimes, you may need to change the owner of a file or a directory. The 'chown' command, which stands for 'change owner', can help you achieve this.
For instance, to change the ownership of a file named 'sample.txt' to a user named 'john', you would use the following command:
$ chown john sample.txtChanging Group Ownership with Chgrp
'Chgrp', or 'change group', is used to change the group ownership of a file or directory. To change the group ownership of the same 'sample.txt' file to 'admin', the command would be:
$ chgrp admin sample.txtChanging Permissions to Execute Scripts
Often, you'll want to execute a file as a script. For that, you'll need to ensure the file has 'execute' permissions. To add execute permissions for a file named 'script.sh', you can use the chmod command:
$ chmod +x script.shRemember, file permissions are a critical component of system security - understanding them helps to maintain a robust, secure system.
File Ownership and Permissions in Practice
Once you've got the hang of setting basic file permissions, it's time to look at more advanced and practical examples of where and how to use these commands.
Consider the scenario where you're working in a team environment. Your team is developing a web application, and everyone needs access to the application files. However, you want to restrict write access to the team leader only.
First, let's change the ownership of the directory containing the project files to the team leader, 'leader'. We'll use the -R flag with the chown command to change the ownership recursively for all files and subdirectories.
$ chown -R leader: webapp/Next, we will change the permissions so that the 'leader' has read, write, and execute permissions, while the group and others have only read and execute permissions. The octal for this would be '755'.
$ chmod -R 755 webapp/The -R flag ensures that the command is applied recursively to every file and subdirectory inside 'webapp/'.
Now, let's say a new developer joins the team, and they need write access to a specific directory within the web application. First, you'd add them to the appropriate group with the usermod command. Assuming the developer's username is 'dev1' and the group is 'webdev':
$ usermod -aG webdev dev1Next, you would change the group ownership of the specific directory to 'webdev', and grant read, write, and execute permissions to the group.
$ chgrp -R webdev webapp/specific_dir/
$ chmod -R 775 webapp/specific_dir/
Regular Maintenance and Security Best Practices
Beyond just setting permissions and forgetting them, it's important to regularly review and manage file permissions as part of your routine system maintenance. This will help ensure your system remains secure and efficient.
Here are some best practices to keep in mind:
Limit Permissions: Don't grant more permissions than necessary. The principle of least privilege, which involves providing only the permissions necessary to perform a task, should guide your permissions strategy.
Regular Audits: Conduct regular audits of file permissions to detect any potential security risks. This could include permissions that are too loose or files and directories that should be private but aren't.
Use Sudo Sparingly: Be careful when running commands with 'sudo'. 'Sudo' runs commands with root permissions, and it's easy to accidentally change permissions on important system files, potentially causing serious issues.
Protect Sensitive Files: Certain files, such as those containing passwords or other sensitive data, should always be kept private with strict permissions (for example, '600' for files that should only be accessible by the user).
By following these best practices and maintaining a solid understanding of Linux file permissions, you'll be well-equipped to manage and secure your Linux systems effectively. Remember, file permissions are not just about control but also about maintaining the integrity and security of your systems.
Special File Permissions
Alongside the basic read, write, and execute permissions, Linux also provides a set of special permissions: the Setuid, Setgid, and Sticky Bit.
Setuid (Set User ID)
The Setuid permission on a file allows the file to be executed with the permissions of the file's owner. This is particularly useful for executable programs that need higher permissions to run.
To set the Setuid permission, you can use the command:
$ chmod u+s filenameOr, in octal format, you'd use '4' as the first digit, like:
$ chmod 4755 filenameSetgid (Set Group ID)
The Setgid permission, when set on a file, allows the file to be executed with the permissions of the group owner. If set on a directory, it ensures that new files created within the directory inherit their group from the directory, not the user who created the file.
The commands to set the Setgid permission are:
$ chmod g+s filename
$ chmod 2755 filename
Sticky Bit
The Sticky Bit, when set on a directory, prevents users from deleting files in the directory that they don't own. This is useful for shared directories.
You can set the Sticky Bit using:
$ chmod +t directoryname
$ chmod 1755 directoryname
File Access Control Lists (ACLs)
Linux also provides another layer of control over file and directory access through Access Control Lists (ACLs). ACLs allow you to set permissions for specific users and groups, beyond the standard user, group, and other entities.
To view the ACL for a file or directory, use the getfacl command:
$ getfacl filename
To set an ACL entry, use the setfacl command:
$ setfacl -m u:username:permissions filename
For example, to grant read and write permissions to user 'john' for file 'report.txt', you would use:
$ setfacl -m u:john:rw report.txt
This allows for fine-grained control over file and directory access and is particularly useful in shared and collaborative environments.
Conclusion
There you have it - a comprehensive guide on understanding and managing Linux file permissions. We've walked through the basics of reading and setting file permissions with octal and symbolic notation, understood binary and octal numbers, compared chmod, chown, and chgrp commands, and their uses, touched on the special permissions and ACLs, and delved into some practical and advanced usage scenarios.
While mastering file permissions and ownership in Linux can seem complex, it's a critical skill to develop for managing and securing your Linux environments. Remember, practice makes perfect - so don't hesitate to spend time at the command line experimenting with these concepts.
Keep this guide handy for reference as you journey further into the world of Linux. With each step, you'll gain more control and understanding of your system, enabling you to harness the full power and flexibility that Linux offers.


